Advanced UFig
Instead of specifying all objects yourself, one can use the catalog generator
galsbi.ucat to generate a galaxy catalog that is then rendered by ufig. The best
way to run such a script is by using a config file.
To run the following tutorial, you need to additionally install galsbi and
SExtractor. galsbi can be installed via pip or uv, see the
galsbi documentation.
Installation instructions for SExtractor can be found
here.
Basic config file
A basic config file to simulate (and save) images in 5 bands based on some default galaxy population parameters might look like this:
import os

import numpy as np
import galsbi.ucat.config.common
import ufig.config.common
from cosmo_torrent import data_path
from ivy.loop import Loop
from ufig.workflow_util import FiltersStopCriteria

# Import all common settings from ucat and ufig
for name in [name for name in dir(galsbi.ucat.config.common) if not name.startswith("__")]:
    globals()[name] = getattr(galsbi.ucat.config.common, name)
for name in [name for name in dir(ufig.config.common) if not name.startswith("__")]:
    globals()[name] = getattr(ufig.config.common, name)


pixscale = 0.168
size_x = 1000
size_y = 1000
ra0 = 0
dec0 = 0

# Define the filters
filters = ["g", "r", "i"]
filters_full_names = {
    "B": "SuprimeCam_B",
    "g": "HSC_g",
    "r": "HSC_r2",
    "i": "HSC_i2",
}

# Define the plugins that should be used
plugins = [
    "ufig.plugins.multi_band_setup",
    "galsbi.ucat.plugins.sample_galaxies",
    Loop(
        [
            "ufig.plugins.single_band_setup",
            "ufig.plugins.add_psf",
            "ufig.plugins.render_galaxies_flexion",
            "ufig.plugins.write_image",
        ],
        stop=FiltersStopCriteria(),
    ),
    "ivy.plugin.show_stats",
]

filters_file_name = os.path.join(
    data_path("HSC_tables"), "HSC_filters_collection_yfix.h5"
)
n_templates = 5
templates_file_name = os.path.join(
    data_path("template_BlantonRoweis07"), "template_spectra_BlantonRoweis07.h5"
)
extinction_map_file_name = os.path.join(
    data_path("lambda_sfd_ebv"), "lambda_sfd_ebv.fits"
)
magnitude_calculation = "table"
templates_int_tables_file_name = os.path.join(
    data_path("HSC_tables"), "HSC_template_integrals_yfix.h5"
)
The loop is used such that the psf and the rendering of the image is
done for all filter bands separately while the plugins outside the loop
are called only once for all filter bands. For more information on how
to create a realistic galaxy sample, we refer to the documentation of galsbi.
This config file can be directly ran with ivy.execute
import ivy

ctx = ivy.execute("basic_config")
from astropy.io import fits
from astropy.visualization import ImageNormalize, LogStretch
from astropy.visualization.mpl_normalize import ImageNormalize
from astropy.visualization import PercentileInterval
import matplotlib.pyplot as plt

interval = PercentileInterval(95)
hdul = fits.open("ufig_i.fits")
data = hdul[0].data + 1# to normalize
hdul.close()

vmin, vmax = interval.get_limits(data)
norm = ImageNormalize(vmin=vmin, vmax=vmax, stretch=LogStretch())


fig, axs = plt.subplots(1, 3, figsize=(6, 3), sharex=True, sharey=True)
for i, f in enumerate(["g", "r", "i"]):
    hdul = fits.open(f"ufig_{f}.fits")
    d = hdul[0].data + 1
    hdul.close()
    axs[i].set_title(f)
    axs[i].imshow(d, cmap='gray', norm=norm)

Advanced config files
The above example is not rendering any stars or including background effects. A more advanced config file can include these additional effects:
import os

import numpy as np
import galsbi.ucat.config.common
import ufig.config.common
from cosmo_torrent import data_path
from ivy.loop import Loop
from ufig.workflow_util import FiltersStopCriteria

# Import all common settings from ucat and ufig
for name in [name for name in dir(galsbi.ucat.config.common) if not name.startswith("__")]:
    globals()[name] = getattr(galsbi.ucat.config.common, name)
for name in [name for name in dir(ufig.config.common) if not name.startswith("__")]:
    globals()[name] = getattr(ufig.config.common, name)


pixscale = 0.168
size_x = 1000
size_y = 1000
ra0 = 0
dec0 = 0

# Define the filters
filters = ["g", "r", "i"]
filters_full_names = {
    "B": "SuprimeCam_B",
    "g": "HSC_g",
    "r": "HSC_r2",
    "i": "HSC_i2",
}

# Define the plugins that should be used
plugins = [
    "ufig.plugins.multi_band_setup",
    "galsbi.ucat.plugins.sample_galaxies",
    "ufig.plugins.draw_stars_besancon_map",
    Loop(
        [
            "ufig.plugins.single_band_setup",
            "ufig.plugins.background_noise",
            "ufig.plugins.resample",
            "ufig.plugins.add_psf",

            "ufig.plugins.render_galaxies_flexion",
            "ufig.plugins.render_stars_photon",
            "ufig.plugins.convert_photons_to_adu",
            "ufig.plugins.saturate_pixels",
            "ufig.plugins.write_image",
        ],
        stop=FiltersStopCriteria(),
    ),
    "ivy.plugin.show_stats",
]

star_catalogue_type = "besancon_map"
besancon_map_path = os.path.join(
    data_path("besancon_HSC"), "besancon_HSC.h5"
)

filters_file_name = os.path.join(
    data_path("HSC_tables"), "HSC_filters_collection_yfix.h5"
)
n_templates = 5
templates_file_name = os.path.join(
    data_path("template_BlantonRoweis07"), "template_spectra_BlantonRoweis07.h5"
)
extinction_map_file_name = os.path.join(
    data_path("lambda_sfd_ebv"), "lambda_sfd_ebv.fits"
)
magnitude_calculation = "table"
templates_int_tables_file_name = os.path.join(
    data_path("HSC_tables"), "HSC_template_integrals_yfix.h5"
)
ctx = ivy.execute("advanced_config")
interval = PercentileInterval(95)
hdul = fits.open("ufig_i.fits")
data = hdul[0].data
hdul.close()

vmin, vmax = interval.get_limits(data)
norm = ImageNormalize(vmin=vmin, vmax=vmax, stretch=LogStretch())


fig, axs = plt.subplots(1, 3, figsize=(6, 3), sharex=True, sharey=True)
for i, f in enumerate(["g", "r", "i"]):
    hdul = fits.open(f"ufig_{f}.fits")
    d = hdul[0].data
    hdul.close()
    axs[i].set_title(f)
    axs[i].imshow(d, cmap='gray', norm=norm)

The impact of the background noise is visible in the images. The galaxies are still at the same position, therefore it is also possible to find some stars (e.g. the very bright sport next to the brightest and largest galaxy).
Run SExtractor
To run SExtractor on the image, one just has to add the
ufig.plugins.run_sextractor_forced_photometry or
ufig.plugins.run_sextractor to the config file. Then a catalog with
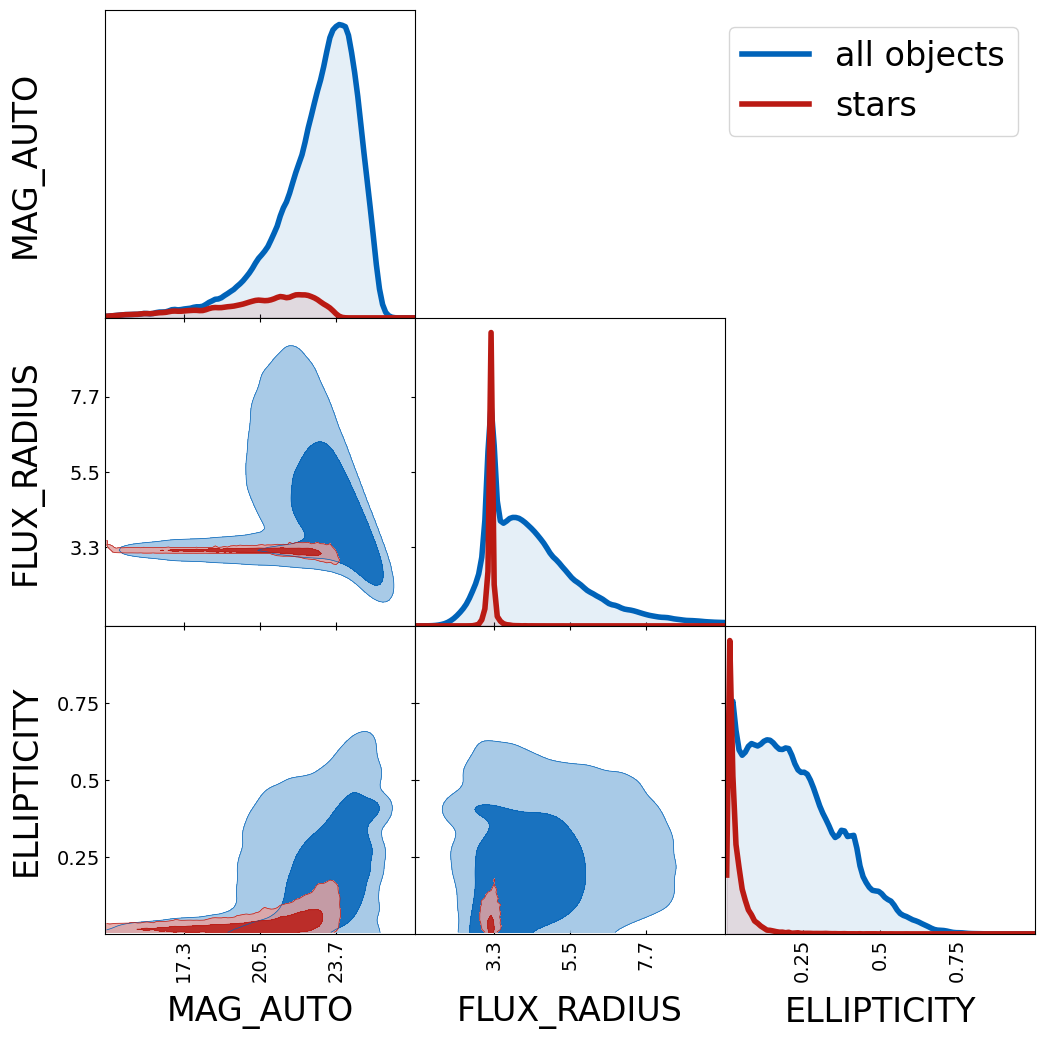
all detected objects will be saved. Plotting the catalog reveals a sharp
peak in the size around the PSF size (mainly driven by the stars). The
configuration of the source extraction can be adapted, see
ufig.config.common for the default values.
from cosmic_toolbox import arraytools as at
from trianglechain import TriangleChain
from cosmic_toolbox import colors


colors.set_cycle()

ctx = ivy.execute("sextractor_config")
cat = at.load_hdf_cols("ufig_r_forced_photo.sexcat")

tri = TriangleChain(
    params=["MAG_AUTO", "FLUX_RADIUS", "ELLIPTICITY"],
    ranges={"MAG_AUTO": [14, 27], "FLUX_RADIUS": [1,10], "ELLIPTICITY": [0,1]},
    histograms_1D_density=False,
    fill=True
)
tri.contour_cl(cat, label="all objects")
tri.contour_cl(cat[cat["CLASS_STAR"]>0.9], label="stars", show_legend=True)

Further features
ufig offers additional features that are not covered in this
tutorial. Some of the most relevant plugins are listed below:
Emulator: An alternative to SExtractor is available through the run_emulator plugin.
Flags: The add_generic_stamp_flags plugin allows you to add flags to the image.
Matching: To match SExtractor objects with ucat objects, use either
match_sextractor_catalog_multiband_read or
match_sextractor_seg_catalog_multiband_read.
Catalog: Finally, you can save the catalog using the write_catalog plugin.
Adapting ufig to your workflow
The easiest way to adapt ufig to your workflow is by using a customized config file. Check out all the different parameters and their discription in ufig.config.common. If you require new features, writing a new plugin is straightforward. A template plugin is shown below
from ivy.plugin.base_plugin import BasePlugin

class Plugin(BasePlugin):
    def __call__(self):

        # accessing all parameters from the config by calling the context
        par = self.ctx.parameters

        # implement new functionality


    def __str__(self):
        return "new plugin doing something"
If you want to adapt the scripts that generate the intrinsic catalog or easily generate catalogs from a model that is constrained by data, have a look at the galsbi documentation.